Sunday, June 15, 2014

Module Naming Conventions for Play 2.2 and IntelliJ 13.1

So today I noticed something strange with +IntelliJ IDEA and the +Play Framework 's build.sbt file.

Say you create a project using the following method:


1. Create a new app using the play new command (testapp)
2. Naming the application (Test_Application)
3. Selecting the Simple Java application template

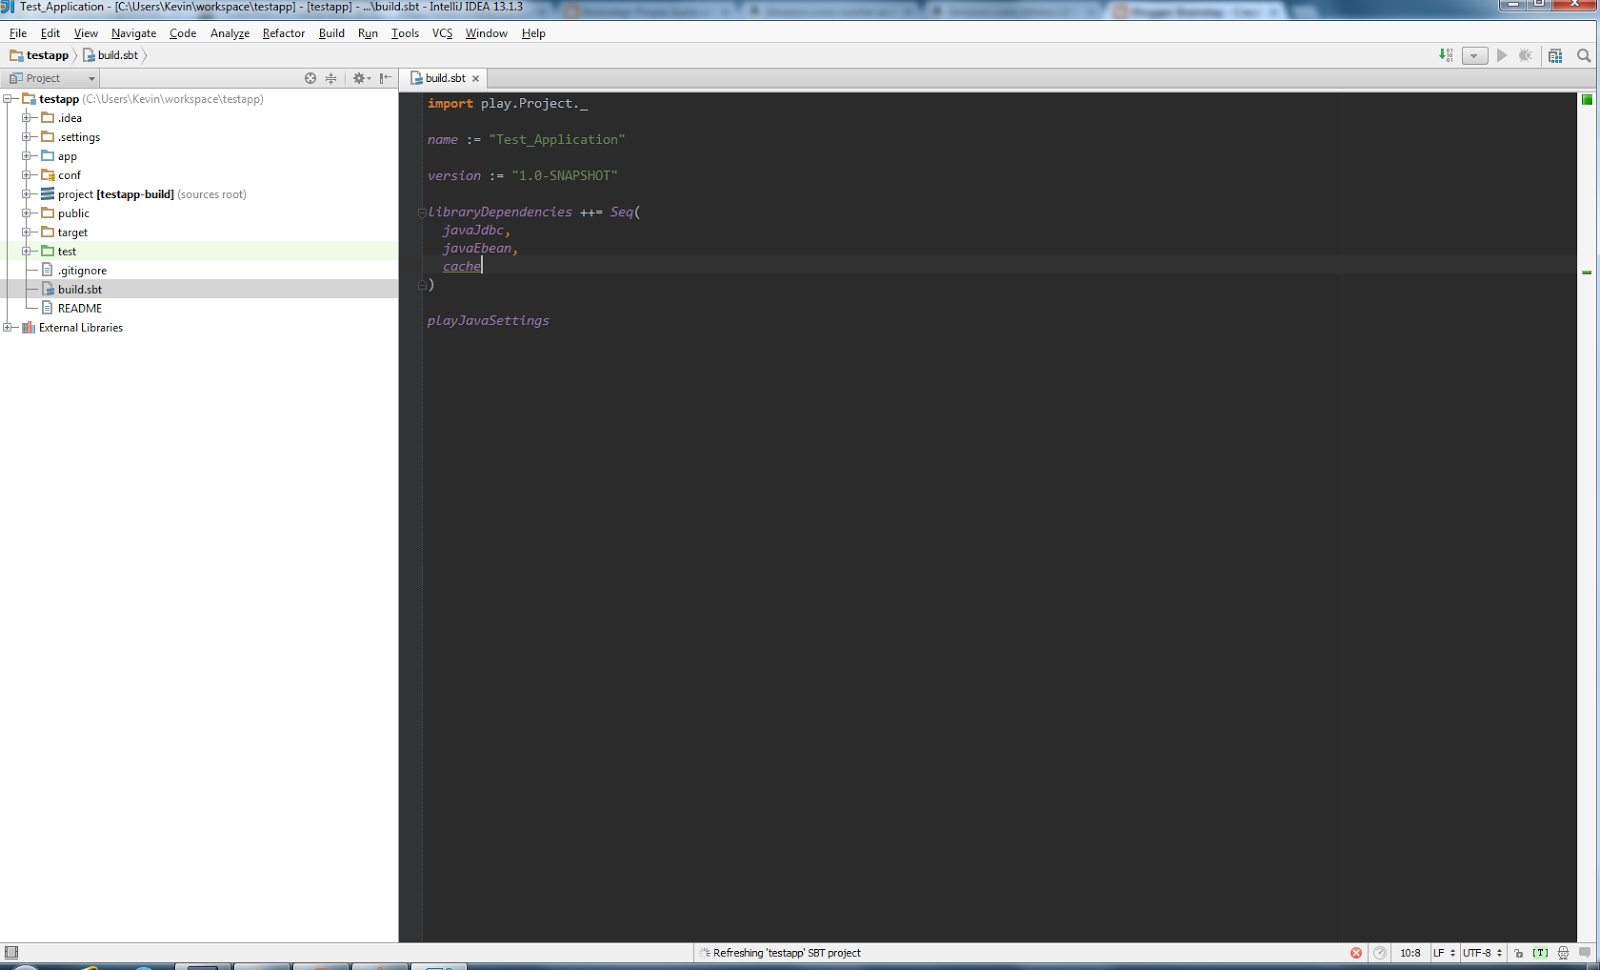
When you open the project with IntelliJ and look at the build.sbt file, this is what you see:


This means that the project ins't properly resolving within IntelliJ. This can lead to false error flags and almost zero code assist support when building your controllers and whatnot. Now your Play application will still run as normal, but at this point you might as well use Notepad to do your code editing - IntelliJ will be almost useless to you.

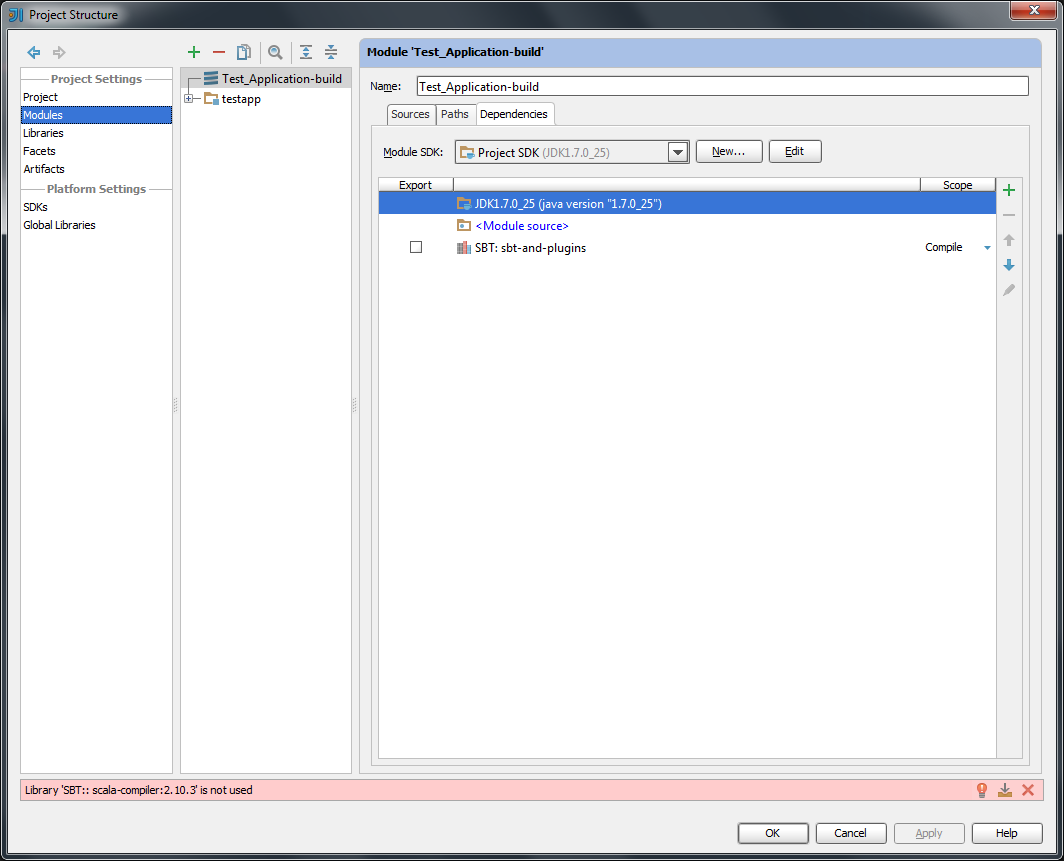
The fix, however is simple. Simply rename the project's build module to the same name as the main project module and attach "-build" to the end of it. This can be achieved by going to File > Project structure... > Modules. Mine show up like this;


From here what I will do is change the build module's name to "testapp-build", 


click OK and when I look at my build.sbt file again, everything should resolve properly and my code assist should work splendidly:


Well, it's almost fixed. Restructure the file as follows to make sure the library dependencies resolve properly as well:


To avoid all this tra-la-la, I would advise skipping the step to name your application when creating the application from the command line. 

Happy coding!

Bug affects:
Play 2.2.3
IntelliJ 13.1.3 Build IU-135.909
Play plugin 0.38.437


Tuesday, June 03, 2014

Proper build.sbt Settings for Play 2.2 and IntelliJ

I came across a bug today that cause IntelliJ 13.1 to act strangely when passing Java objects to Scala templates.


For example the snippet:
public static Result login() {
 ok(login.render(Form.form(Login.class)));
}

will compile and run, but IntelliJ will flag it as an error because it says that it found a play.data.Form object when the Scala template was expecting a play.api.data.Form object. Now that's just the tip of the iceberg, I even found that in some cases my routes (for redirects within the controller) were flagged as unresolvable objects.

Fear not, for the solution is simple. Your build.sbt file will look like this when Play generates the project:
name := "testapp"

version := "1.0-SNAPSHOT"

libraryDependencies ++= Seq(
  javaJdbc,
  javaEbean,
  cache
)  

play.Project.playJavaSettings

Simply change it as follows:

import play.Project._

name := "testapp2"

version := "1.0-SNAPSHOT"

libraryDependencies ++= Seq(
  javaJdbc,
  javaEbean,
  cache
)     

playJavaSettings

Run the following commands:
play clean
play compile

And voila! Those nasty red squiggly lines are gone.

Bug notes


This bug was present in the following software and their versions:

IntelliJ IDEA version: 13.1 IU-135.475
Play Framework version: 2.2.1 - 2.2.3
Play 2.0 plugin version: 0.33.404
Scala plugin version: 0.33.403

Sunday, November 03, 2013

GTA; The Lost and the Damned Final Thoughts

Even though it was a product of +Rockstar Games  I thought I would never play and never like GTA: The Lost and Damned because I found the characters repulsive, depraved, degenerate and unlikable, and the protagonist - Johnny Klebitz - was voiced by an overcompensating wannabe tough guy with a very forced "gravel voice".

After playing and completing it though, I have to say I really like it. My initial critiques still stand, but the overall story, pacing and gameplay is perfect for busy people who enjoy the engaging narrative of a full Grand Theft Auto game without the investment of time needed to unlock all the cool toys and see the entire city.

Now I was never a fan of the whole death metal, leather jacket, biker scene so it was a bit difficult for me to get into the story and start caring about the characters even with such an exciting and edgy trailer...


 But once I did my regrets were zero.

I'd describe this as a perfect day-off experience. Long and involved enough to keep you occupied all day but short enough to allow you to get to the conclusion of the story before the sun sets.

Wednesday, October 30, 2013

Running Play 2.1.x App as Windows Service (Fat Free Version)


In this post, I'll show you how to run your Play 2.1.x app silently as a background service and give you a couple tools you can use to ease the administration process for your app. All of this without the use of third party tools.


For this tutorial we will use the Zentasks sample application that came bundled with the framework. This tutorial assumes that:

  • The zentasks project folder is located in C:\apps\zentasks
  • The Java executable is located at C:\Program Files\Java\jdk1.7.0_25\bin\

Adjust these directories to suit your needs. Let's get started.

The Problem


You have several apps that you need to deploy in a production Windows environment, but you hate having the pesky command prompt window visible in the background when you run play start for each application. You want your apps to run silently as Windows services on startup.

The Solution


Create a standalone distribution of your app by opening a command window and running

cd c:\apps\zentasks
play clean dist

In the dist folder of the application directory, you should see an archive named zentasks-1.0-SNAPSHOT.zip Extract the contents of that archive to the current folder.

In my case the location of my app is C:\apps\zentasks and the location of the folder I just extracted from the archive is C:\apps\zentasks\dis\zentasks-1.0-SNAPSHOT.

To run my app invisibly, I take advantage of the javaw.exe application bundled with my Java installation. This file does exactly what java.exe does but it does it in the background without showing a console window.

Note before continuing: Either turn off evolutions or set them to automatic in the application.conf file. You can do that by following the example here. Once that's done, run play dist again.

In a command prompt window I then run the following commands:
cd c:\apps\zentasks\dist\zentasks-1.0-SNAPSHOT
javaw -cp lib\* play.core.server.NettyServer

You'll notice that the command runs and returns you to the command prompt. Give it a couple seconds and go to http://locahost:9000 (or whatever port you set the app to run on) and see if your app is running. It should be.


Once you have that sorted out, let's move on. We're going to create two batch files for starting and stopping the application. Once these files are created we can also place them in the Startup folder on our Start menu to have them execute when Windows starts up.

Batch File #1: Start.bat


Open a Notepad document and paste in the following:
cd .
start "" "C:\Program Files\Java\jdk1.7.0_25\bin\javaw.exe" -cp lib\* play.core.server.NettyServer

Substitute the correct paths where necessary and save the file as start.bat in your application's dist\zentasks-1.0-SNAPSHOT directory.

To test the file, open task manager and kill the javaw.exe process,


then go to your application's dist\zentasks-1.0-SNAPSHOT directory and delete the RUNNING_PID file. Now double-click start.bat, wait a couple seconds then go to http://localhost:9000 to check if your app is up. It should be.

Batch File #2: Stop.bat

If starting your app in production mode is now that easy, then stopping it should be too.

Again, open a new Notepad document and paste in the following:
set /p pid=<RUNNING_PID
taskkill /PID %pid% /F
DEL RUNNING_PID

That information goes on three separate lines. Save the file as stop.bat, place it in your app's dist\zentasks-1.0-SNAPSHOT directory and when you run it, it should kill the javaw process that your app is running on and delete the RUNNING_PID file as well. To ensure that your app has been shut down, go to http://localhost:9000 and observe that your app is down. At the end of it all your directory structure is supposed to look as follows:

* zentasks  
 *-- dist      
 *-- zentasks-1.0-SNAPSHOT          
 *-- lib          
 *-- RUNNING_PID          
 *-- start.bat          
 *-- stop.bat 

You can now take this folder and plop it down on your production server worry-free. Yay!

Q&A 

But what about my configuration options? What if I want to change the port that the application is running on?
 Simple. In start.bat include -Dhttp.port=xxxx or any other configuration options before the -cp argument. E.g:

start "" "C:\Program Files\Java\jdk1.7.0_25\bin\javaw.exe" -Dhttp.port=9001 -Dconfig.resource=prod.conf -cp ...

Is starting the application this way safe?
As far as I can tell, yes. The long and short of the story is that the command you place in the start.bat file is what is essentially run when you execute play start plus or minus a few directory and Java option changes. +James Ward and the +Play Framework team are free to correct me on this if I'm wrong.

Where will the logs and other necessary files be created? A directory for logs will be created in the dist\zentasks-1.0-SNAPSHOT folder and an application.log file will be placed there. File system h2 databases will be placed in the dist\zentasks-1.0-SNAPSHOT folder.

Where does the application read configuration items from in this mode?
In the lib directory of dist\zentasks-1.0-SNAPSHOT  there is a file named zentasks_2.10-1.0-SNAPSHOT.jar If you were to extract the contents of this file, you'd see all the evolutions and *.conf files your created up to the point in time you ran the play dist command.

I hope this was helpful to you. Thanks to +James Ward and the amazing +Play Framework team for all their hard work, and as always thank you for reading.

Wednesday, October 16, 2013

Scheduling Jobs In Play 2

In this tutorial, I'll show you how to schedule asynchronous jobs in the Play! Framework version 2.1.3.

The Play! Framework has moved away from using Job classes with Crontab-like annotations for application level task scheduling. In place of the old model we find heavy use of the Akka system, which operates a bit differently and can take some getting used to if you're accustomed to the CRON/Quartz way of doing things.

Let's get started!

After creating our application, we need to create a Global.java file in the app/ directory. Place the following in the file:

import play.Application;
import play.GlobalSettings;
import play.libs.Akka;
import scala.concurrent.duration.FiniteDuration;

import java.lang.reflect.Method;
import java.util.Date;
import java.util.HashMap;
import java.util.List;
import java.util.concurrent.TimeUnit;

public class Global extends GlobalSettings {
    @Override
    public void onStart(Application app) {
      //Magic goes here
   }
       
}

The above is nothing too complex. It's a file that contains code that will be executed upon starting the application. The important piece is the onStart method that has the @Override annotation. That's where we're going to place our scheduling code.

Before continuing, you should probably take a look at what the Play devs have to say about the use of their Akka scheduler before I give my personal explanation.

Place the following in the onStart method of the Global.java file we just created.

FiniteDuration delay = FiniteDuration.create(0, TimeUnit.SECONDS);
FiniteDuration frequency = FiniteDuration.create(5, TimeUnit.SECONDS);

Runnable showTime = new Runnable() {
   @Override
   public void run() {
      System.out.println("Time is now: " + new Date());
   }
};

Akka.system().scheduler().schedule(delay, frequency, showTime, Akka.system().dispatcher());

The above simply allows us to log the current time to the console ever 5 seconds. Not very useful, but it's a start. Run the application and see for yourself.

schedule() Arguments Explained

Before we continue we should probably get a firm grip of the schedule(...) method signature.

delay - How long after the application starts should I wait before running my code?
frequency - After I've run my code the first time, how often should I repeat it?
showTime - A runnable containing the code that is to be run after the delay and at the defined frequency.
Akka.system.dispatcher() - Not entirely sure what this is, but it's needed as the last argument.

Neither of the first two arguments can be changed from within the Runnable body. The delay (and frequency) must be calculated on application start correctly and in such a way that the timing of the job is not affected by application restarts.

Defining a Proper Schedule

Now that we've covered the basics, let's move on to creating a useful schedule. The schedule that we'll create will run a task at 4PM every day.

The first step is to determine the delay i.e. how long the scheduler should wait to execute our task once the application has started. The challenge here is that the calculation of the delay must accommodate random application restarts. Say, for example, we start our application at 8AM, the job should wait roughly 6 hours before it starts, but if at 3PM the need arises for us to restart the application, the delay should be recalculated to 1 hour. We will calculate this delay in seconds for better precision.

I'll be using the Calendar class, but feel free to use JodaTime if you're more comfortable. So let's augment our previous code snippet to calculate this delay:
Long delayInSeconds;

Calendar c = Calendar.getInstance();
c.set(Calendar.HOUR_OF_DAY, 16);
c.set(Calendar.MINUTE, 0);
c.set(Calendar.SECOND, 0);
Date plannedStart = c.getTime();
Date now = new Date();
Date nextRun;
if(now.after(plannedStart)) {
   c.add(Calendar.DAY_OF_WEEK, 1);
   nextRun = c.getTime();
} else {
   nextRun = c.getTime();
  }
 delayinSeconds = (nextRun.getTime() - now.getTime()) / 1000; //To convert milliseconds to seconds.

Code explanation:
Calendar c = Calendar.getInstance();
c.set(Calendar.HOUR_OF_DAY, 16);
c.set(Calendar.MINUTE, 0);
c.set(Calendar.SECOND, 0);
Date plannedStart = c.getTime();

Use a Calendar object and set it's time to 4PM of the current day, then create a date object to store the current date and the intended start time based on the modified Calendar object.
Date now = new Date();
Date nextRun;
if(now.after(plannedStart)) {
   c.add(Calendar.DAY_OF_WEEK, 1);
   nextRun = c.getTime();
} else {
   nextRun = c.getTime();
  }

Find out the current date and time (now) and create a new Date object (nextRun) that will store the date and time of the next code execute.If the time now is after the time we planned to start the job, then we'll set the time that the job should execute to be tomorrow at 4PM. If not then we're on schedule and the nextRun will be today at 4PM.
delayInSeconds = (nextRun.getTime() - now.getTime()) / 1000; //To convert milliseconds to seconds.


Next we do some simple subtraction to find out how many seconds between now and the next time the code should run. This is our delay... In seconds, of course.

From here on it's gravy. Simply substitute the delayInSeconds value for the integer value in the FiniteDuration delay variable and change the frequency to 1 day as follows:


FiniteDuration delay = FiniteDuration.create(delayInSeconds, TimeUnit.SECONDS);
FiniteDuration frequency = FiniteDuration.create(1, TimeUnit.DAYS);
Runnable showTime ...
Altogether Now!

Long delayInSeconds;

Calendar c = Calendar.getInstance();
c.set(Calendar.HOUR_OF_DAY, 16);
c.set(Calendar.MINUTE, 0);
c.set(Calendar.SECOND, 0);
Date plannedStart = c.getTime();
Date now = new Date();
Date nextRun;
if(now.after(plannedStart)) {
   c.add(Calendar.DAY_OF_WEEK, 1);
   nextRun = c.getTime();
} else {
   nextRun = c.getTime();
  }
 delayInSeconds = (nextRun.getTime() - now.getTime()) / 1000; //To convert milliseconds to seconds.

FiniteDuration delay = FiniteDuration.create(delayInSeconds, TimeUnit.SECONDS);
FiniteDuration frequency = FiniteDuration.create(1, TimeUnit.DAYS);
Runnable showTime = new Runnable() {
            @Override
            public void run() {
                System.out.println("Time is now: " + new Date());
            }
        };

Akka.system().scheduler().schedule(delay, frequency, showTime, Akka.system().dispatcher());

Now every day at 4PM your application will remind you of the time. Awesome.

Thanks very much to +James Ward and this magnificent post for helping me wrap my head around this tricky concept. Thanks to the +Typesafe folks for all their hard work with the +Play Framework , and as always thank you for reading.


Wednesday, October 02, 2013

How to Install Play 2 War: The Bare Minimum

In this post, I'll show you how to install the Play 2 War extension. This article describes the installation and configuration procedure for Play 2.1.x applications.

From the author: 
This project is a module for Play framework 2 to package your apps into standard WAR packages. It can be used with Servlet 3.0 and 2.5 containers (Tomcat 6/7, Jetty 7/8/9, JBoss 5/6/7, ...)
Step 1: Add the Plugin to plugins.sbt

Navigate to \project and open the plugins.sbt file. Add the following line to the end of the file:

addSbtPlugin("com.github.play2war" % "play2-war-plugin" % "1.0")

Note: Be sure to include an empty line between this line and the previous addSbtPlugin statement.

Step 2: Add Play2War keys to Build.scala

In the same folder as plugins.sbt, you'll find the file Build.scala. Open this file and follow the template below for modifying it. Items in bold are the new lines that were added. Items in italics are items that can be modified to suit your application's needs.

import sbt._
import Keys._
import play.Project._
import com.github.play2war.plugin._

object ApplicationBuild extends Build {

  val appName         = "your_app_name"
  val appVersion      = "1.0-SNAPSHOT"

  val appDependencies = Seq(
    // Add your project dependencies here,
    javaCore,
    javaJdbc,
    javaEbean
  )

  val main = play.Project(appName, appVersion, appDependencies)
  .settings(Play2WarPlugin.play2WarSettings: _*).settings(
    // Add your own project settings here  
Play2WarKeys.servletVersion := "3.0"
  ).settings(
Play2WarKeys.targetName := Some("war_file_name")
  )


}

Tip: The full list of Play2WarKeys and their expected data types can be found here.

Step 3: Resolve Dependencies and Build the WAR

Open a command terminal and cd into your project's directory. Once there, run the following commands:

play
clean
dependencies
war

Once the war command has completed you can look in \target to see the generated WAR file. You can then take this file and deploy it to your servlet container of choice.

Why Would I Want to Use This Plugin?

That's a great question especially seeing that Play comes with its own high performance web server built in. My answer to that question is if you work in a Windows-centric environment like mine, you become acquainted with the "shortcomings" of the Play framework when it comes to production deployment in a Windows environment. Unlike Linux where you can easily set your application to run as a service in the background on startup, Windows forces you to resort to all sorts of .bat magic that leaves you with a bunch of command line windows popping up and having to stay open for the duration of the application's life.

So for a cleaner, less cluttered production server that other members of your team can appreciate, I recommend using a Servlet container like Tomcat that can be installed as Windows service and set to run on startup. No more .bat magic and no more freaking out when the server admin says he restarted the server a couple hours ago and now the folks in HR can't access the employee registration application.

Closing Remarks

In all, the installation of this extension was easy once you figured out how to switch mental context to deal with the different syntaxes for each file that has to be manipulated. I find that in some cases the author of the documentation could have gone into a little more detail in addressing the little gotchas with each file type. For example the need for an empty space between lines in the plugins.sbt file. Thankfully the Play command was smart enough to point this out to me when I tried to start the application and it was an easy fix.

That being said, though the installation of this particular plugin was not all that difficult, I would still like to see some more abstraction in the plugin installation process. I think the guys over at +Typesafe could take a very interesting page out of the Rails book in this regard.

That's it for now. I hope this article was useful.


Wednesday, September 25, 2013

Styling Apps In Android - Not for the Faint of Heart

If it's one thing I would like to see in future Android APIs is more support for the artistic side of app creation.

Coming from a Web/CSS background, I was expecting things like drop shadows, gradients, rounded corners, selective border colours etc. to be relatively easy to implement. As it turns out, it's not. For example, getting rounded corners on an ImageView involves a fair amount of coding (as illustrated here: http://stackoverflow.com/questions/16208365/create-circular-image-view-in-android). It's especially hurtful when doing the same in iOS is so headslappingly simple http://stackoverflow.com/questions/7705879/ios-create-a-uiimage-or-uiimageview-with-rounded-corners I just wish making my apps look cool was a much easier process.


Anyway, if anybody feels the same way, knows of easier ways to achieve aesthetic gold or if the styling and graphics APIs are supposed to get a reboot anytime soon, sound off in the comments below. 

Sunday, August 25, 2013

Play Framework 2.x - Taking the Plunge


So after many months of kicking and screaming against being forced into the new 2.x.x branch of the Play! Framework I finally decided to take a weekend and learn the damn thing and get it over with.


Pros

Much more powerful and feature packed than the 1.x branch
In addition to some serious code optimizations and refactorings, things like an interactive console, built in H2 in-memory database browser and a built-in LESS and CoffeeScript compiler are just a few of the bells and whistles added on that really add to the development experience.

The Scala templating language is not as scary as it sounds
...And that's coming from a Java developer. Yes, I really enjoyed using this templating system even though some things took a couple minutes to really sink in. Parameter groups? What's that?

The new ebean ORM 
Though I've only used it to complete the Zen Tasks tutorial, i'm seeing that it requires a lot less hand-holding in the JPA annotation department. Give it a @ManyToOne annotation in one class and you don't need to go to the related class and set up the mappings. It's something I haven't seen done anywhere else (except Rails, I think) and it's nice to see it available here in sweet ol' Java. 


Cons

Not as friendly, free form an "playful" as the 1.x branch. 
Doing the simplest of things requires a lot more typing, planning and thought now. Gone are the days when I could have just done this:

public static void updateUser(User user) {
 user.save();
 render();
}

Now I have to do:

public static void updateUser() {
 Form userForm = form(User.class).bindFromRequest();
 User u = userForm.get();
 u.save();
 ok(views.html.users.updateUser.html);
}

This approach provides certain advantages, but it really takes away from the appeal and fun I had with the 1.x approach.

Documentation is a bit lacking
I wish the documentation could have been organized better and be more detailed a la 1.x. Certain sections like Forms and Action Composition could use a little attention.

Searching for help turns into a hunt
Searching for help online usually returns 1.x or 2.x Scala results. This is not helpful to a 2.x Java developer.

Other Thoughts

I've been a big fan of the +Play Framework since I walked away from Rails over a year ago. I haven't looked back since. Part of what made me fall so madly in love with it was it's power without being verbose; elegant simplicity without the need for me to get embroiled in XML files and the like. I could have hardly believed it was Java I was using!

As of late though, it's become a bit heavier and less of a tool that I could use to knock out a prototype in no time flat. Don't get me wrong, it's still miles better than Spring or Struts (shudder), but it's just not as free form and delightful as it was when it was younger. I do understand, though, that some of its "agility" was sacrificed to introduce better optimized code and more powerful technologies, so I guess I'll just file this under the price of progress.


For those of you wondering why I took a weekend, this included getting comfortable with +IntelliJ IDEA and wrangling with the many technical issues that came up with the Scala and Play2 plugins. IntelliJ is a marvelous IDE and has proved me wrong in believing that Eclipse was the be all and end all of Java IDEs, but I think the Play 2 plugin could use some work. It won't, for example, let me reference a template via index.render(...), so I have to do views.html.index.render(...) or import views.html.index before I can call the render method. It's a minor issue, but majorly annoying when I'm trying to dance my way across the keyboard to project completion.

Conclusion

In closing I'd like to say that Play 2 is not the horrid, complex mess I thought it was. Sure it's a bit different and sure i'll have to wave goodbye to some of my old habits, but the framework has been made better and future proofed for tomorrows web application developers. I really appreciate all the hard work that +James Ward and the team at Typesafe have been doing. 

Here's hoping that Play 3.0 will be backwards compatible!


Sunday, May 26, 2013

Why I Am Choosing the Playstation 4

It's almost that time again, folks - the time where we choose our allegiances for the next generation of the console wars, while berating and ridiculing anyone else who chooses a system different to the one we chose.

Now before I begin, I must declare that this post is not titled why you should choose the Playstation 4, but why I am making it my companion for my next romp in the Elysian fields of console gaming.

Why the Playstation 4?

One word: Exclusives. I am most interested in the properties that are tied to the Sony brand than any other platform. Why buy an Xbox or an absurdly powerful PC when I will only end up quaking nervously to find out if Hideo Kojima will ever release his next game for anything other than Sony Playstation. It simply doesn't make sense.


When that next MGS/Uncharted/The Last of Us drops, I want it IMMEDIATELY.

What's Wrong with the Xbox?

Nothing at all. As a matter of fact, I have never owned an Xbox to find out what are some things I may not like about it. As for whether or not I will even consider picking up an Xbox later down the line, it's a possibility should there be a piece of IP that is just that good that I absolutely have to have it.

Currently though, Halo just isn't my thing and the new Xbox One's slew of living room features just don't make a compelling enough case for me to pick this thing up on day one.

You Fool! PC is Where It's At!

And you maybe right, more so in this console generation than ever. For those of you who aren't acquainted with each system's technical specifications, these new systems are basically just PCs with a smaller form factor and features that make them more suitable for your living room than for editing PowerPoint presentations.

Be that as it may, I have a very awful taste in my mouth regarding PC ports of last generation's games. I found that far too often I had to become this great PC hackboy to get some of my favourite games to work well. When it wasn't replacing particle files to fix visual glitches, it was simply a case of poor PC optimization on behalf of the developers. I'm looking at you GTA 4.

Worse yet, all of my PS2 faves like Vice City and San Andreas just didn't carry over well once I started getting more modern hardware for my PC. I actually had to install a video card "hack tool" to get them to play properly on my Radon 6670. Not to mention the laughable support for more recent joypads.

These are issues that console gamers simply don't have to worry about, but were my nightmare almost every time I installed a game that was ported from the consoles to PC.

Sure you can throw the argument about better graphics and modding ability at me, but the truth is I never really cared for mods and I remember enjoying Vice City immensely on the PS2 in all it's buggy and glitchy glory. I'm prepared to sacrifice a bit of visual fidelity for the sake of a hassle-free gaming experience.

Now it may be safe to conclude that the source of all of the last generation's PC ports were so terrible due to the Playstation 3's Cell processor and that this generation's ports may be much better due to the fact that both consoles are using more standardized PC-like hardware, but that remains to be seen.

I may still end up build a gaming PC to catch the odd game or two that are "tremendously better on PC" but i'll be taking my time with that project.

In conclusion/TLDR:
  • I'm choosing the PS4 because I like the exclusives.
  • I'm not choosing the Xbox One because I don't really care for that platform's exclusives.
  • I'm not choosing PC (from the get-go) because of the terrible console ports of last generation.
  • You are free to decide which one you want to go with.


Thursday, January 17, 2013

Today I Fed A Man

Walking in to my new neighbourhood convenience store, I caught a whisper of a beggar asking me for some change. I mostly ignored him and continued on.

While inside the store his voice ricocheted around the inside of my head like a vindictive stray bullet. I wrestled with logic and my humanity as I weighed the pros and cons of giving this beggar some money - if I give him cash he'll probably spend it on drugs, so maybe I should default and give him some food instead.

By the time I came to this conclusion I was already out the store, groceries in hand.

I saw him looking at me expectantly, all the while counting up some singles and fives; his day's take I guess.

To put an end to this absurdly long thought process I just reached into my pocket and handed him two of the singles that happened to be in there. He accepted it graciously.

A few minutes later, my short term memory kicked back in and reminded me that I needed some matches. There was a small parlour across the street,so there I headed to make my last purchase.

As I'm standing by the counter counting my pennies, up comes the beggar behind me and with the fives and singles he was counting, purchased a small loaf of bread, a snack and a drink. He then looked at me, the delight in his eyes shining through his bushy eyebrows, and said "thank you brother!"

At that point I swore I could feel the Holy Spirit smiling at me and nodding in approval. Best feeling I had all day knowing that I fed my saviour.

Friday, December 07, 2012

It's About Doing Something Good

It's not always about the fame and the fortune. Sometimes it's as simple as saving someone the headache of having to get a new ID card, passport or driver's permit.

I was saved from this torment twice and now I think it's time I return the favour to my countrymen.


Friday, November 30, 2012

Fixing a Problem

Problems. They're everywhere, especially in my country. They range from simple annoyances to huge socio-economic issues that will take a large amount of effort, money and divine intervention to cure.

As humongous or diminutive as problems might be I believe that the solutions to them come about by chipping away at the issue in a very incremental manner. It just takes time and a fair amount of consistency, but eventually the problem will dissolve.

But what about this case - what do you do in a case where the solution to the problem is so simple, yet the people for whom you are solving the problem are too paranoid and distrusting for them to even dip their toe in the solution unless they see someone else drinking the proverbial Kool-Aid first? What do you do then? What becomes of the problem? Can it still be classified as a problem since nobody seems to want it solved or everybody balks at the presented solution?

There is a culture in my country that says no solution (or product in a general sense of the word) is any good unless millions have been spent in creating it is presented with lavish press conferences and promotional campaigns. I honestly find this highly annoying and it shows where we are as a people in terms of our mental development.

I'm daring to change that culture and see if I can bring my country even one step closer to the 21st century. That's why I'm challenging myself to fix a problem that plagues everyone in my country, and i'm going to fix it with a budget of $20USD and I want to see how my countrymen react to it. It's going to be practical, free and simple to use. Let's see how it goes.


Thursday, August 23, 2012

jQuery QR Code Generator

So I came across a QR Code (2D Barcode) generator tonight that is written in pure JavaScript, relies on jQuery and makes 0 calls to any external API.

It's called jQuery QR Code and it's written by Jerome Etienne. Take a look at his GitHub project and tell me  what you think. This will definitely come in handy on my current project!

Saturday, March 03, 2012

Fixing Ubuntu Issues: No Wireless on Reboot

Continuing on with my series on solving problems I've encountered while using Ubuntu 11.10, I've found yet another solution to a problem that I heard a lot of people talking about. It's also a hot topic on the Ubuntu forums. I',m speaking, of course, about Ubuntu and wireless internet access.

In recent times it has not been uncommon for Ubuntu to not be able to connect to my wireless network on boot up, so I did some digging and found out that the problem was that the Automatic DHCP IPv4 settings were to blame. My solution: use manual IPv4 configuration. Here's how.

My internet set up is as follows :- My modem is connected to my wireless router which propagates the signal that my PC's USB wireless adapter receives. There's plenty of networking going on there, (something I am not the best at) but I do know that finding out the IP addresses of my various pieces of network hardware will be the key.

So on my Windows machine i ran ipconfig and found out those addresses:

192.168.1.1 - My modem's address
192.168.2.1 - My wireless router's address (Default gateway)
192.168.2.5 - Address of PC
255.255.255.0 - Subnet mask

I took those settings over to Ubuntu, opened the network manager by clicking the Wireless icon in the top task bar, selecting Edit connections... > Wireless > FBI_VAN_467 (My SSID) > Edit... > IPv4 Settings and entering the information as follows:


I chose a random non-conflicting IP address for my Ubuntu PC's address, used my wireless router's IP address for my default gateway and set my DNS server address to my modem's address.

After that it worked like a charm. I hope this helps!


Thursday, March 01, 2012

New Search Engine - DuckDuckGo

After reading this very interesting and informative article (http://dontbubble.us/) and hearing mentions of it in the tech-o-sphere, I was intrigued to look into this DuckDuckGo search engine to see what it was about.

Now, anybody who knows me knows that I'm a G-Man (Google Man) through and through, but honestly i've not been to happy about their recent skirmishes with the law when it comes to people's privacy and the extent to which they will go to get your personal information so that they can target ads to better suit you.

Truthfully I was never a fan of the idea that I was being herded and processed by a big company that was going to use my personal information, my likes, dislikes, hobbies - my personality - to make money, but I had to tolerate it because it was the companies behind some of the best internet services that I use were doing this.

Now there's a new duck in the search engine pond and this one is more morally secure and less thirsty for money and is doing... just fine! I'm talking of course, about DuckDuckGo.

Granted i've only been using it for a grand total of 6 hours, I was very impressed with the speed, the relevance of the search and the cleanliness of the design... I'm just not too fond of the name. It doesn't quite adhere to the web 2.0 naming convention of 2 syllables, real/unreal word but I guess it sort of works for them. DuckDuckGo doesn't really roll off the tongue like Google or Yahoo or Bing but the name contributes to the overall playful charm of the site and to be honest, I would be reluctant to use another Web 2.0 named search engine like Searchly or Fynd or something like that.

A Sample Search

I did a Google search for  Railscasts and compared the results to those I found on DuckDuckGo. I preferred Duck's search results. They pointed to some more relevant resources.

Google Search Results

Results from the Duck
I personally prefer Duck's results. As you can see I snatched up the Railscasts them for Vim :) What do you think?

Friday, February 24, 2012

Validating Virtual Attributes in Rails 3.1

When validating virtual attributes in Rails it's important to remember that they are just that - virtual attributes. I spent almost an hour last night trying to figure out why my validations were throwing an error when I called Object.valid? My class was structured similar to the following (forgive me, I am a Rails n00b):
Class User

attr_accessor :password

validates :password,
:presence => true,
:on => create

validates :password,
:length => { :minimum => 6 :maximum => 8 },
:if => :password?
.
.
.
end
When calling valid? on the User object I got a method undefined error for password?. I could't quite figure it out and I was wondering what I was doing wrong until eventually I tried appending the following to the bottom of the class definition:
.
.
.
def password?
 self.password.present?
end
.
.
.
An seemingly simple and obvious solution, I know, but this took me about an hour to figure out after Stack Overflow failed me for the first time.

I hope this helps save someone else the frustration I endured.

Thursday, February 23, 2012

Fixing Ubuntu Issues: Ugly Font Rendering in NetBeans

Recently i've had the displeasure of working in NetBeans on Ubuntu. The IDE is great but the font rendering is terrible. Here's my solution to this problem.

The first step is to uninstall Open JDK (if it is installed) and install Sun's JRE. Do that by selecting the following packages in the synaptic package manager:

  • sun-java6-bin
  • sun-java6-jdk
  • sun-java6-jre

Mark all installed instances of Open JDk for uninstallation if you have to, then click Apply.

Confirm your Java version by going to the console and entering

java -version
You should see
java version "1.6.0_26"
Java(TM) SE Runtime Environment (build 1.6.0_26-b03)
Java HotSpot(TM) Server VM (build 20.1-b02, mixed mode)
Now that that's done, install Microsoft's Core Fonts. Do this by going to the Ubuntu Software Center and searching for 
ttf-mscorefonts
Install them, then open NetBeans, go to Tools > Options > Fonts and Colours and choose the Courier New font. I set mine to size 18 bold. Here is my result:


Before


After

Wednesday, February 22, 2012

Fixing Ubuntu Issues: Restart Wireless Without Reboot

Sometimes after resuming from sleep, you would find that your wireless connection no longer works. Up until now, my only solution to this was to reboot. I've found an alternative solution from user mariosx on http://ubuntuforums.org/archive/index.php/t-913407.html that involves simply restarting the wireless interface. To do so, enter the following in a terminal window


sudo ifconfig eth1 down
sudo ifconfig eth1 up

Where eth1 = your network interface. Could be wlan0 or something like that. I have not yet tried this out, but it's one of the more sane solutions i've come accross for this problem during my searches.

Fixing Ubuntu Issues: Flickering Pointer

Upon instlaling Ubuntu 11.10 some of may notice that the cursor constantly flickers and sometimes disappears randomly. To solve this do the following:

Note: xorg.conf is depreciated in Ubuntu 11+

Type the following in a new console window:

cd /usr/share/X11/xorg.conf.d

sudo touch 10-monitor.conf

sudo gedit 10-monitor.conf

Paste the following into the file, changing variables where indicated by the comments

Section "Monitor"
    Identifier    "Monitor0"
EndSection

Section "Device"
    Identifier    "Device0"
    Driver        "nvidia" #Choose the driver used for this monitor
EndSection

Section "Screen"
    Identifier    "Screen0"  #Collapse Monitor and Device section to Screen section
    Device        "Device0"
    Monitor       "Monitor0"
    DefaultDepth  24 #Choose the depth (16||24)
    SubSection "Display"
        Depth     24
        Modes     "1680x1050" #Choose the resolution
    EndSubSection
EndSection

Save the file.

Press CTRL + ALT + FI to enter terminal mode and type the following:

sudo stop lightdm

sudo start lightdm

Log in and notice that the cursor does not flicker any more. You may have to unplug your mouse and plug in back in to get the cursor to work. If you do not get back to the graphical mode after starting the display manager, press CTRL + ALT + F7

Reference: http://ubuntuforums.org/showthread.php?t=1730188

Friday, July 29, 2011

Venturing Into Vim

So I heard that there's this new code editor out, and it's been out for about three decades now... so I guess when I say new I mean new to me.

As an aspiring Ruby on Rails developer, I looked around to see what was the best code editor I can/should use for handling the development of a RoR web application. The vote went almost unanimously to Vim - a minimalist as (according to its veterans) extremely powerful code editor.

So this week I took a journey into Vim land to see what all the buzz was about and boy was it a rough one. Vim is not Notepad++, Komodo Edit or any other code editor that you've used before, and that's a key concept to remember when learning to use Vim, because operating as you did in your previous editors will send you into a mad swirling fit of rage and confusion.

Vim is it's own beast. The fact that you have to press a key before entering text and press another key when you've finished entering text should tell you a lot.

After a week of use, though, I must say that I chose wisely in the investment of my time and I would like to encourage my fellow coders to do the same. Get in the know with this great (yet sometimes frustrating) piece of software; it's powerful, simple and fast.

There isn't an opinion of Vim that wasn't stated by Jeffrey Way over at his blog, so I'll leave it up to you do some further reading.


Happy Vimming!